 Marketing managers are flooded with requests for assets. Your inbox is overflowing, there’s no good way to manage the process, and there is a constant fear that things are getting missed.
The good news is, there’s actually a super slick process for this in CoSchedule.
Imagine never having to see another marketing request come into your inbox? This can be your reality when you manage the process with CoSchedule. Simply follow the step-by-step process in this blog post OR download the free worksheet below.
Marketing managers are flooded with requests for assets. Your inbox is overflowing, there’s no good way to manage the process, and there is a constant fear that things are getting missed.
The good news is, there’s actually a super slick process for this in CoSchedule.
Imagine never having to see another marketing request come into your inbox? This can be your reality when you manage the process with CoSchedule. Simply follow the step-by-step process in this blog post OR download the free worksheet below.  You’ll find:
- A Google Form template for other departments to use when requesting an asset from your team.
- An example email explaining the change in process.
- A printable PDF worksheet with all the steps to set up this feature.
 Marketing teams are often viewed as internal agencies. Your team is responsible for creating all your company’s creative materials – from sales presentations and tear sheets to ad graphics, conference booth designs, and everything in between.
 This means a ton of leg work for marketing managers, both in terms of managing all the incoming projects, but also in terms of planning when your team has time to actually execute the work.
Here’s how CoSchedule solves it for you:
There are two ways to accomplish this in CoSchedule.
The first way is tailored to marketing teams who have the Ideas Board in CoSchedule.
Not sure if you have the Ideas Board? Head over to your CoSchedule calendar and click the breadcrumb menu. If you see "Ideas" in the drop-down list, continue reading.
If you don't see "Ideas" skip ahead to the second section by clicking here.
- Create a Google Form which people will begin using to request assets from your team.
- When someone fills out the form, Zapier will automatically create a project in your CoSchedule account.
- Drag and drop this project to your calendar to assign it to the relevant team member.
Using The Ideas Board to Prioritize and Organize Incoming Marketing Requests
Follow this process if you have the Ideas Board in CoSchedule.Step 1: Create a Marketing Request Form
The first thing you need to do is create a Google Form with all the details you need from the project requester. This is what people in other departments will use to request projects from your team moving forward. Here’s a Google Form template we’ve created for you. To use it, simply create a copy and save it to your Google Drive.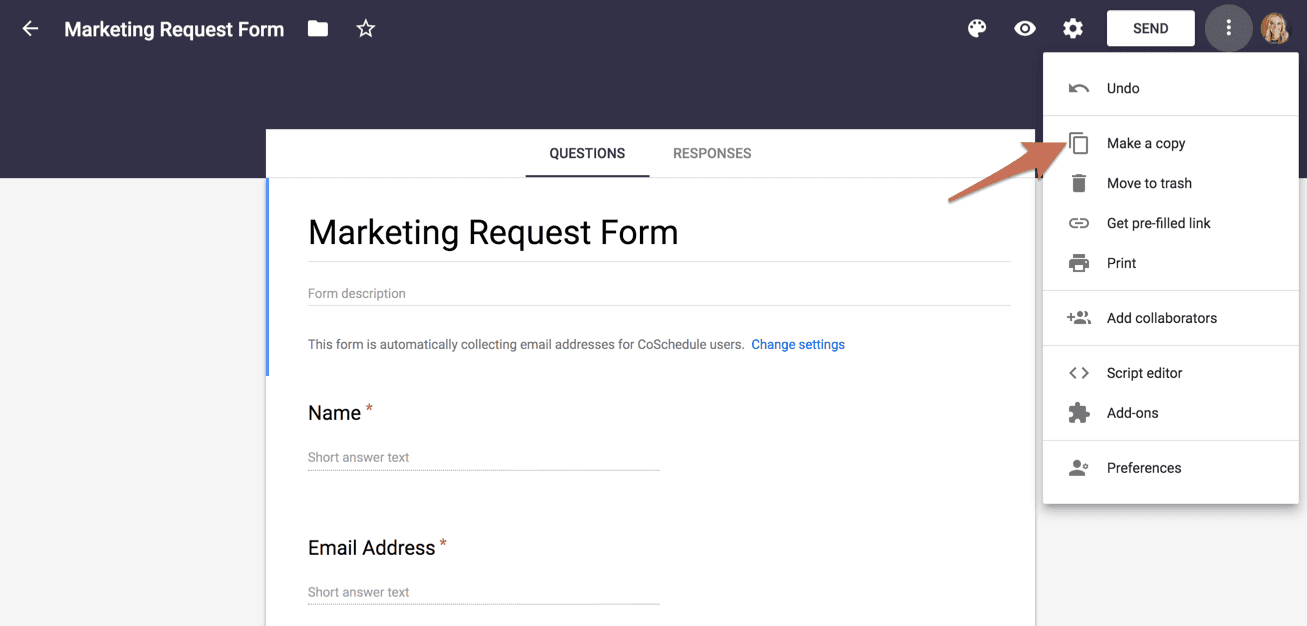 Next, you’ll turn this form into a Google Sheet by clicking the responses tab and saving it as a new spreadsheet in your Google Drive.

Step 2: Create a Custom Status on Your Idea Board
Head over to your CoSchedule calendar and open up your calendar settings by toggling down your name in the top left-hand corner. Then choose "statuses" on the left-hand menu. Create three custom statuses under the ideas section.
- Requested
- Backlog
- Up Next

Step 3: Connect Zapier
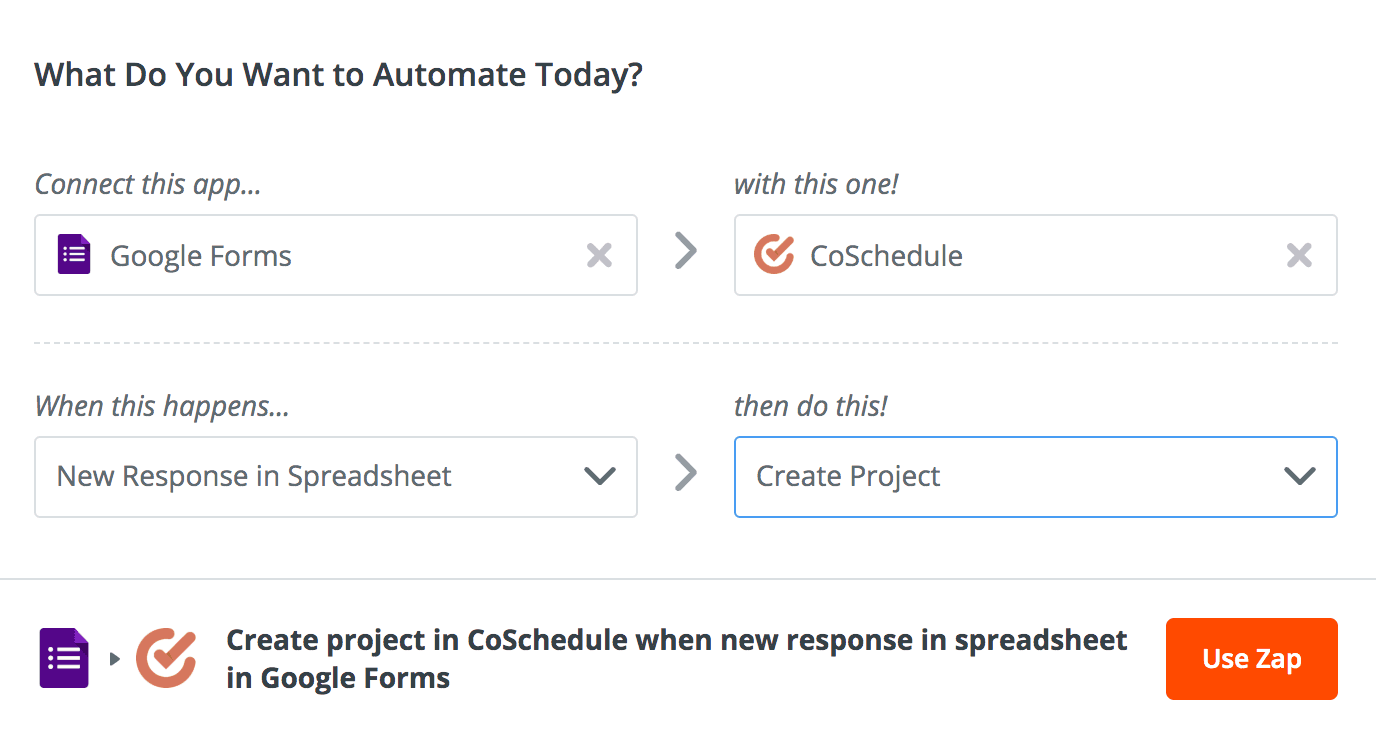
When your Google Form is created and you’ve added custom statuses, connect CoSchedule to the Google Form using Zapier. Head over to the integrations area of CoSchedule and make sure you’ve added Zapier as an integration. Don’t have a Zapier account? Click here to create a free Zapier account. Once you’ve got the Zapier integration added to your CoSchedule calendar, you’ll need to create a Zap in Zapier. In Zapier, choose to connect Google Forms with CoSchedule. Then choose:
When this happens…
New Response in Spreadsheet
Then do this!
Create New Project
Then choose:
When this happens…
New Response in Spreadsheet
Then do this!
Create New Project
 Once you’ve clicked “Use Zap”, Zapier will walk you through the process of setting it up. We’ll go through it below to help.
Sign in to your Google account using the blue button.
Once you’ve clicked “Use Zap”, Zapier will walk you through the process of setting it up. We’ll go through it below to help.
Sign in to your Google account using the blue button.
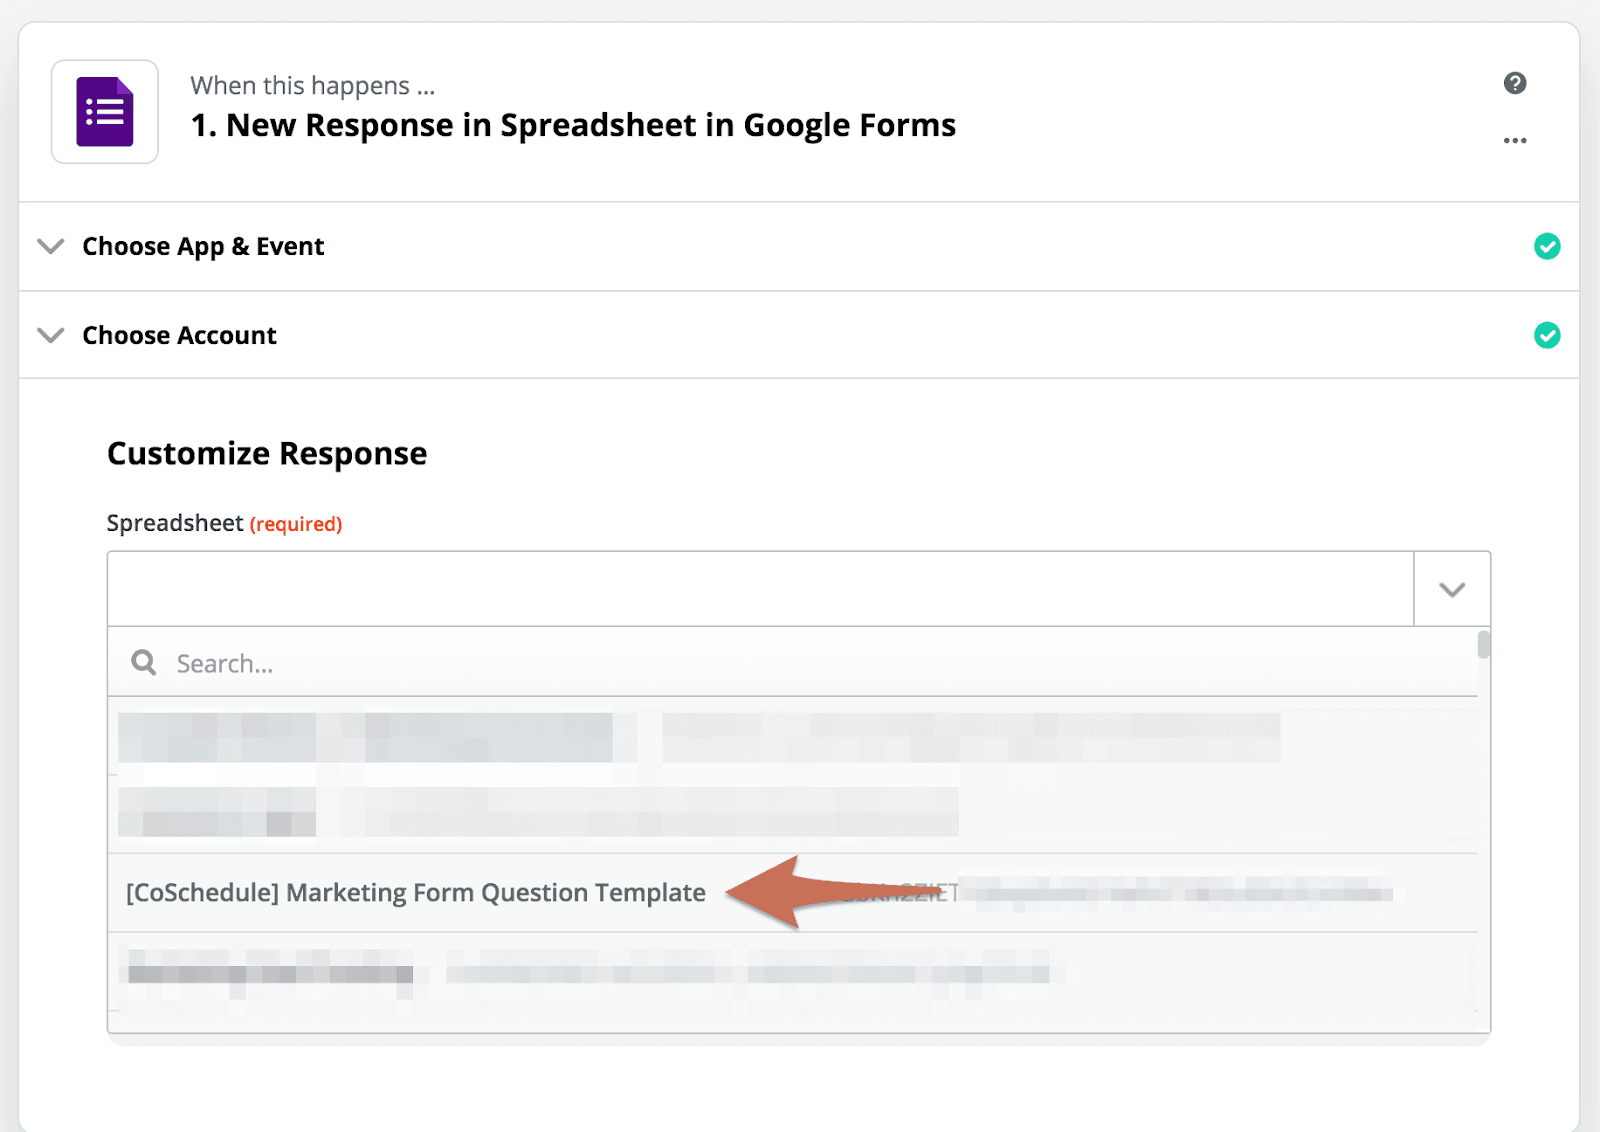
 Using the dropdown menu called “Spreadsheet” find the sheet that you created in step one. It will be called [CoSchedule] Marketing Form Question Template… unless you changed the name.
 Then, choose Sheet1 in the drop-down menu under “Worksheet”.
 Next, you’ll continue on to the CoSchedule part of the Zap set up. You might need to copy and paste the API key from your CoSchedule calendar. You’ll find it in the integrations area on your CoSchedule calendar.
Make sure the app and event are listed as Coschedule and Create Project. Then click continue.
Next, you’ll continue on to the CoSchedule part of the Zap set up. You might need to copy and paste the API key from your CoSchedule calendar. You’ll find it in the integrations area on your CoSchedule calendar.
Make sure the app and event are listed as Coschedule and Create Project. Then click continue.
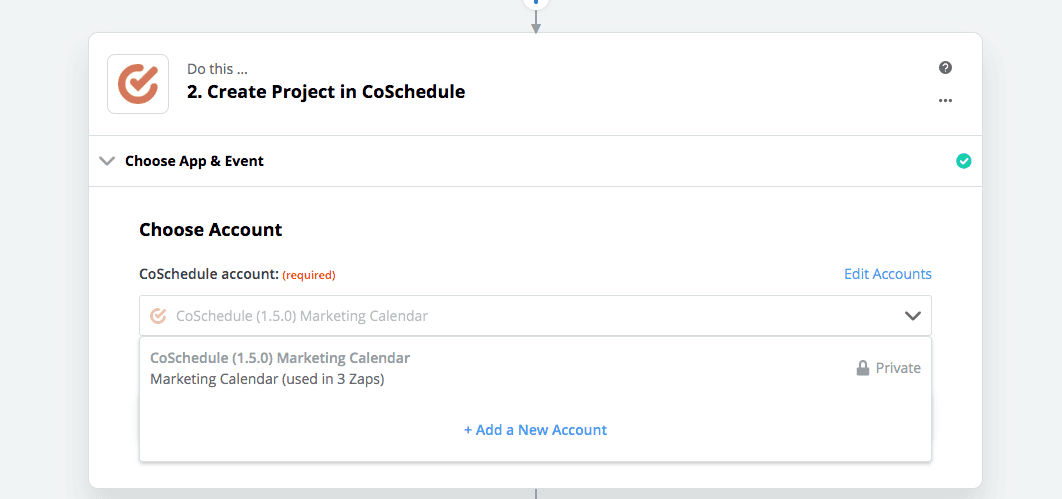
 Choose your CoSchedule account and calendar from the drop-down list.
 Under the title field, find the option that says projectname.
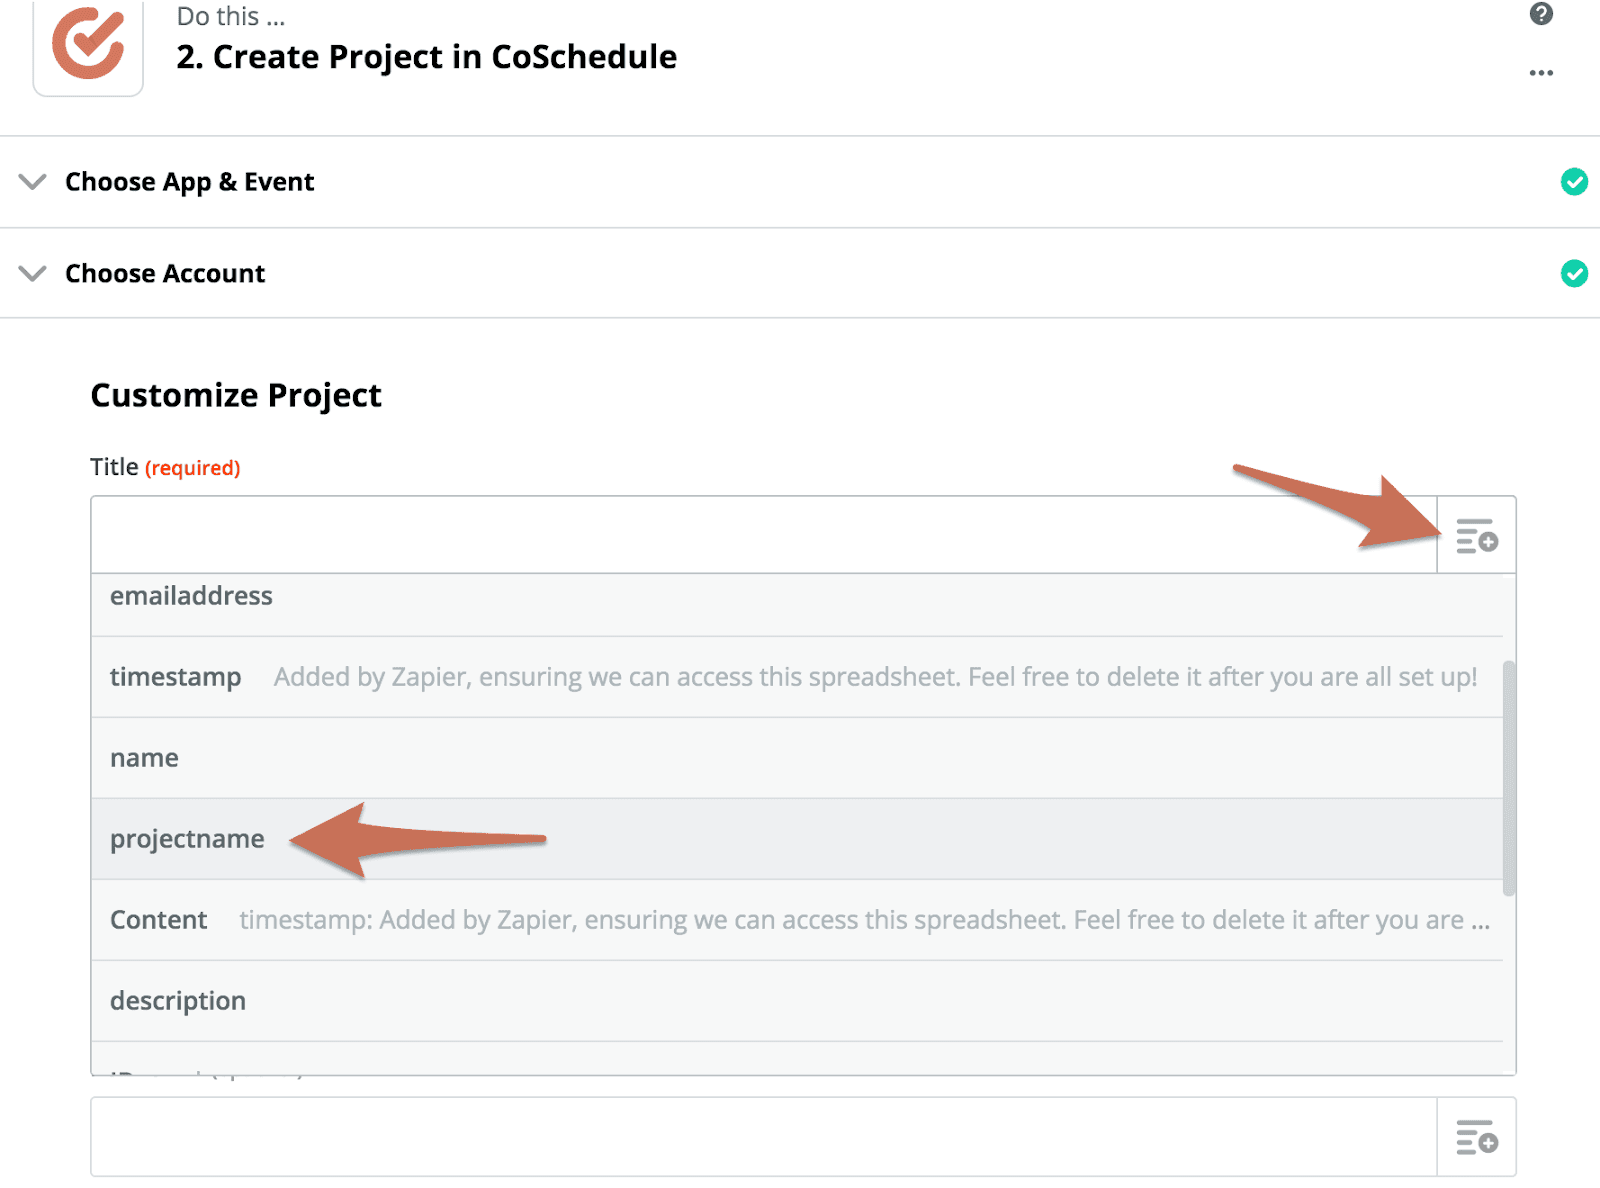 In the description field, choose the option that says “description” from the drop-down menu.
 Next, add yourself as the owner for all requests. This will give you a notification in your CoSchedule dashboard any time a new request is created. Find your name using the drop-down menu to add yourself as the owner.
 Finally, change the status to Idea, and say “Yes” to send the request to your Ideas Board.
 When finished, you'll click “Continue” and finalize your Zap. A test will be sent to your calendar to make sure everything is connected correctly.
Step 4: Send the Google Form to Your Organization
Now that you’ve successfully set up your Zap. You’ll need to tell everyone at your organization that they need to use the Google Form to request marketing collateral from now on. Here’s an example email you can steal to save time.Hi everyone, It’s getting increasingly difficult to track incoming requests for marketing materials. In the interest of saving time and to avoid things getting lost in the shuffle, we will be implementing a new request form. Please fill this out whenever you require something from the marketing team. I recommend bookmarking the link for quick and easy access. Once you submit a request using the form, I will send you a confirmation and expected timeline for delivery. {INSERT THE LINK TO YOUR GOOGLE FORM} Thanks for your cooperation. {YOUR NAME}
Step 5: Monitor Incoming Requests
As you start receiving incoming requests, monitor your Ideas Board. After you've seen the incoming request, move the project into the backlog column. This serves as a visual reminder that you know the request has been submitted and you've seen it in CoSchedule. When projects increase in prioritization, move them to the up next column. When you're ready to schedule the project and have your team start working on it, click the three dots in the corner of the project and select "Move to Calendar". When scheduling the project, choose the date you want your team to start working on it.
Step 6: Share Project Progress With The Requester
In step 2, you created a saved view on your calendar. This creates a calendar view that visualizes all the marketing requests that your team is (or will be) working on. To create a read-only view, click share calendar and select your marketing request view. This creates a read-only version of your calendar so coworkers without CoSchedule accounts can stay updated.
You can also choose to download the saved view as a PDF, rather than using a read-only link.
https://coschedule.wistia.com/medias/jg7qk52kc9
This creates a read-only version of your calendar so coworkers without CoSchedule accounts can stay updated.
You can also choose to download the saved view as a PDF, rather than using a read-only link.
https://coschedule.wistia.com/medias/jg7qk52kc9
Prioritizing and Organizing Incoming Marketing Requests Without The Idea Board
Follow this process if you do not have the Ideas Board in CoSchedule.Step 1: Create a Marketing Request Form
The first thing you need to do is create a Google Form with all the details you need from the project requester. This is what people in other departments will use to request projects from your team moving forward. Here’s a Google Form template we’ve created for you. To use it, simply create a copy and save it to your Google Drive.
Next, you’ll turn this form into a Google Sheet by clicking the responses tab and saving it as a new spreadsheet in your Google Drive.
Step 3: Create a New Marketing Requests Color Label
Head over to your CoSchedule account and navigate to calendar settings. Create a new color label called “Marketing Requests”. This allows you to quickly see when new requests arrive in your Ideas Bin. Keep in mind, the Ideas Bin is different than the Ideas Board. Every CoSchedule account has the Ideas Bin.
You can also filter your Ideas Bin by color label to easily see new incoming requests that need to be assigned and scheduled.
This allows you to quickly see when new requests arrive in your Ideas Bin. Keep in mind, the Ideas Bin is different than the Ideas Board. Every CoSchedule account has the Ideas Bin.
You can also filter your Ideas Bin by color label to easily see new incoming requests that need to be assigned and scheduled.
 Using your marketing requests color label, create a saved view to help filter all of your marketing requests on your calendar and Idea bin.

Step 3: Connect Zapier
When your Google Form is created and you’ve added a new color label, connect CoSchedule to the Google Form using Zapier. Click here to visit the integration area of your CoSchedule account to make sure you’ve added Zapier as an integration. Don’t have a Zapier account? Click here to create a free Zapier account. Once you’ve got the Zapier integration added to your CoSchedule calendar, you’ll need to create a Zap in Zapier. In Zapier, choose to connect Google Forms with CoSchedule. Then choose: When this happens… New Response in Spreadsheet Then do this! Create New Project
Once you’ve clicked “Use Zap”, Zapier will walk you through the process of setting it up. We’ll go through it below to help.
Sign in to your Google account using the blue button.
Using the dropdown menu called “Spreadsheet” find the sheet that you created in step one. It will be called [CoSchedule] Marketing Form Question Template… unless you changed the name.
Then c
hoose Sheet1 in the drop-down menu called “Worksheet”.
Next, you’ll continue on to the CoSchedule part of the Zap set up. You might need to copy and paste the API key from your CoSchedule calendar. You’ll find it in the integrations area on your CoSchedule calendar.
Under the title field, find the option that says projectname.
In the description field, choose the option that says “description” from the drop down menu.
Under the field called Label, choose the “Marketing Requests” color label you just created.
 Next, add yourself as the owner for all requests. This will give you a notification in your CoSchedule dashboard any time a new request is created. Find your name using the drop-down menu to add yourself as the owner.
Finally, change the status to Idea, and say “Yes” to send the request to your Ideas Bin.
When finished, you'll click “Continue” and finalize your Zap. A test will be sent to your calendar to make sure everything is connected correctly.
Next, add yourself as the owner for all requests. This will give you a notification in your CoSchedule dashboard any time a new request is created. Find your name using the drop-down menu to add yourself as the owner.
Finally, change the status to Idea, and say “Yes” to send the request to your Ideas Bin.
When finished, you'll click “Continue” and finalize your Zap. A test will be sent to your calendar to make sure everything is connected correctly.
Step 4: Send the Google Form to Your Organization
Now that you’ve successfully set up your Zap. You’ll need to tell everyone at your organization that they need to use the Google Form to request marketing collateral from now on. Here’s an example email you can steal to save time.Hi everyone, It’s getting increasingly difficult to track incoming requests for marketing materials. In the interest of saving time and to avoid things getting lost in the shuffle, we will be implementing a new request form. Please fill this out whenever you require something from the marketing team. I recommend bookmarking the link for quick and easy access. Once you submit a request using the form, I will send you a confirmation and expected timeline for delivery. {INSERT THE LINK TO YOUR GOOGLE FORM} Thanks for your cooperation. {YOUR NAME}
Step 5: Monitor Incoming Requests
As you start receiving incoming requests, monitor your Ideas Bin. To quickly see incoming requests, filter your Ideas Bin based on the color label you created earlier.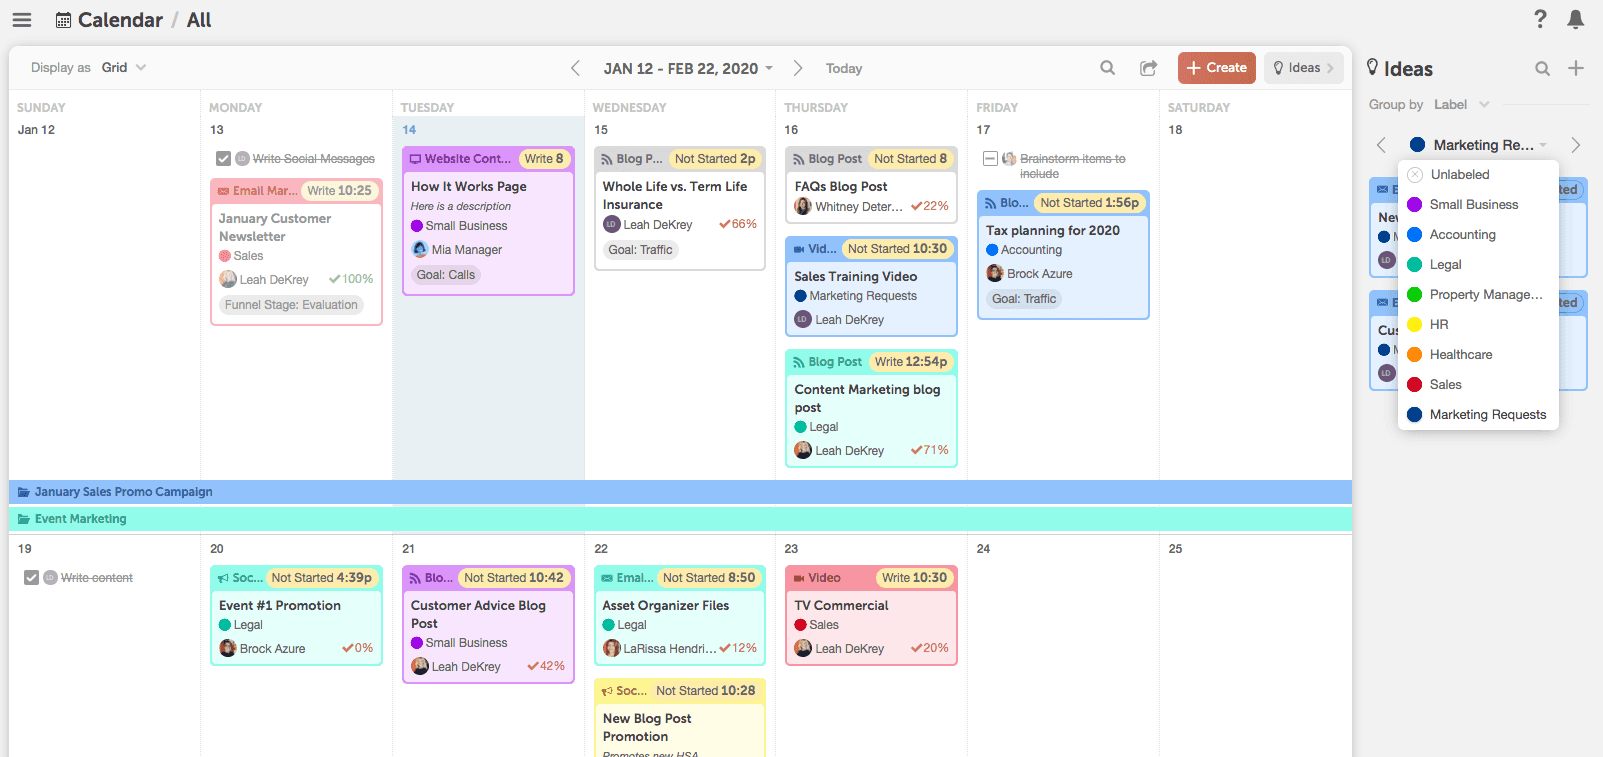 As your team has spare capacity, drag and drop the request to the calendar to schedule it.

Step 6: Share Project Progress With The Requester
In step 2, you created a saved view on your calendar. This creates a calendar view that visualizes all the marketing requests that your team is (or will be) working on. This means you can create a read-only view to share progress with the individuals who have requested projects. To create a read-only view, click share calendar and select your marketing request view.
This creates a read-only version of your calendar so coworkers without CoSchedule accounts can stay updated.
You can also choose to download the saved view as a PDF, rather than using a read-only link.
This blog post was originally published on October 11, 2019. It was updated and republished on January 17, 2020.The post How to Triage Incoming Marketing Requests with CoSchedule appeared first on CoSchedule Blog.