
- How to add a stand-alone new task to the calendar.
- How to add a task to a project.
- How to create a list of tasks in a project.
- How to create task templates with approvals and task rules.
Table of Contents
- Introduction
- Basic Task Management in CoSchedule
- Saving a Task List as a Task Template
- Task Approvals
- Task Rules - Automate Your Workflows
Basic Task Management in CoSchedule
The first thing you’re going to learn about is how to accomplish basic task delegation in CoSchedule. Every CoSchedule power user will get value from this section, regardless of what CoSchedule plan you have. Learning about basic task management and delegation in CoSchedule helps you accomplish better task visibility so everyone on your team knows what they are doing and when they are doing it.Add a Stand Alone Task to the Calendar
Adding a stand-alone task to the calendar is the most basic form of task delegation. When to do this: Add a stand-alone task to the calendar when you need to remind a team member to do a one-off task that is not attached to a project. How to do it: Click the orange ‘Create’ button on the calendar. Then, select ‘More Options’ at the bottom of the drop-down list.
 Finally, choose the option that says ‘Task’.
Name the task, add a color label (if necessary), assign it to a team member, and add a due date.
Finally, choose the option that says ‘Task’.
Name the task, add a color label (if necessary), assign it to a team member, and add a due date.
 The task will automatically appear on the team member’s to-do list.

Add a Task to a Marketing Project
Adding a task directly in a marketing project creates a central hub where everyone can go to see who is doing what and when their tasks are due. This clarity ultimately puts an end to weekly status updates so you’re always in the loop. To start, open a project on your calendar. If you don't have any projects on your calendar yet, create one using the orange create button.
 Once you have a project open from your calendar, you’ll see a grey taskbar along the right-hand side.
 Start by adding a single task to the project. Add a due date and assign a team member who will be responsible for executing the task.

Create a List of Tasks in a Marketing Project
After you’ve created one task in a project, continue adding a list of tasks to build out an entire workflow for the project. Here’s what it could look like when you’re done.

Saving a Task List as a Task Template
This step takes task planning a step further by showing you how to create a task template from the list you just created. Please note: Creating a Task Template can only be performed if you have the Work Organizer within CoSchedule. Not sure if you have the Work Organizer? One easy way to tell is if the “Template” icon is located above your taskbar. Once you’ve populated your first task template, it’s ready to be applied to all future newsletters. This means you can apply the entire workflow and delegate all the tasks with a click of a button.
You’ll see all the tasks magically apply, team members are automatically assigned their responsibilities, and due dates auto-populate based on the project’s date.
If the date of the project changes, the task due dates can also automatically update, which means you won’t have to click into each task to manually reschedule.
To apply your task template on future projects:
Once you’ve populated your first task template, it’s ready to be applied to all future newsletters. This means you can apply the entire workflow and delegate all the tasks with a click of a button.
You’ll see all the tasks magically apply, team members are automatically assigned their responsibilities, and due dates auto-populate based on the project’s date.
If the date of the project changes, the task due dates can also automatically update, which means you won’t have to click into each task to manually reschedule.
To apply your task template on future projects:
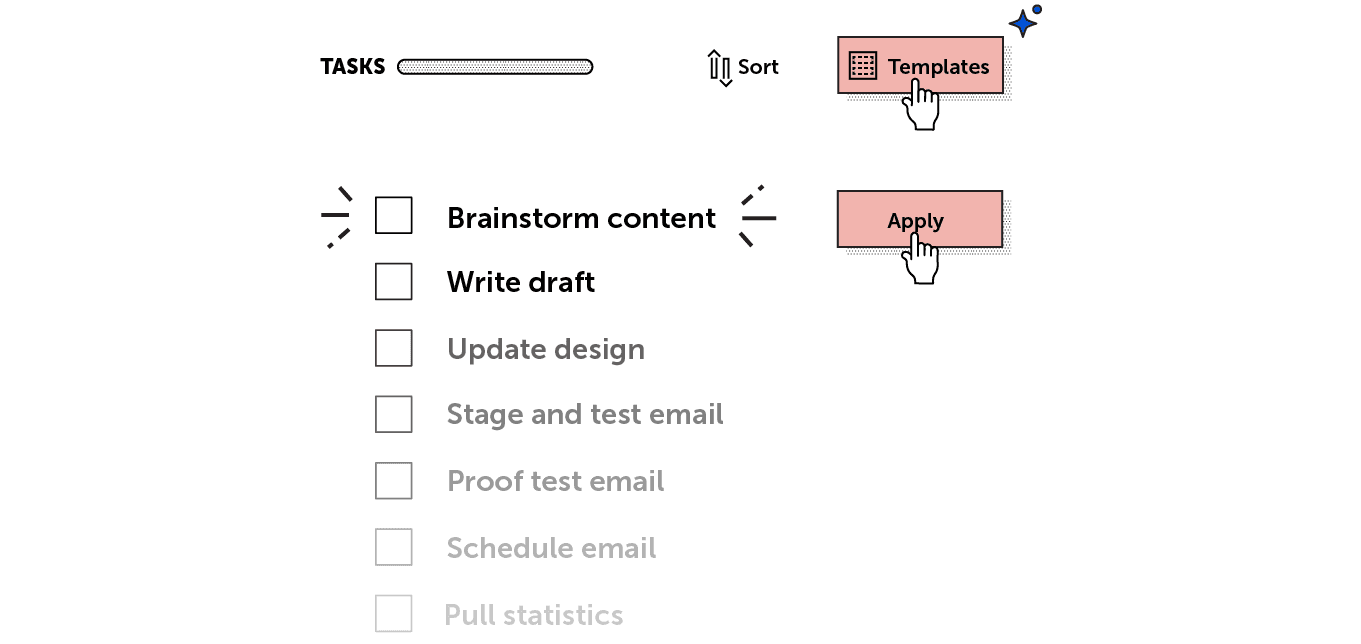
- Plan a new newsletter project on your calendar.
- Click the ‘Templates’ icon in the taskbar.
- Apply the task template you just created.


Task Approvals
Task approvals eliminate the need to manually notify people when a task is ready for their approval. This saves time and removes bottlenecks from forming in the content creation process. Task approvals are only available with Professional and Enterprise Work Organizer plans. Not sure if you have one of these plans? Click on the arrow button over on a task, if you see “approvals”, you’re good to go. Task approvals can be included on any or all tasks within a project’s workflow. Here’s how:
- Click into a project on your calendar.
- Click the templates icon in the task bar.
- Edit the relevant task template by clicking the pencil that appears when you hover.
- Click the arrow next to the task you want to add an approval to.
- Add the approver's name from the drop-down list.
 Once a team member marks a task completed, the individual responsible for approving their work will get a notification on their home dashboard.
It will appear as a task on their to-do list, as well as a notification under the ‘Notifications’ tab.
Once a team member marks a task completed, the individual responsible for approving their work will get a notification on their home dashboard.
It will appear as a task on their to-do list, as well as a notification under the ‘Notifications’ tab.


Task Rules - Automate Your Workflows
Task rules add a layer of automation to your workflow to lessen the time it takes you to monitor project progress and update timelines. Task rules are only available with Professional and Enterprise Work Organizer plans. If you have task approvals in the previous section, you also have access to task rules. Here are a couple of simple task rules you can add to your task templates to save time.Use a Task Rule to Speed Up Project Completion
This task rule helps your team get more done in less time. Say you allocated 10 days in your task template for a writer to produce content for a white paper, however it only took them 5 days to complete the task. This creates a 5 day lag in the production process because the next task isn’t scheduled to begin for another 5 days. A task rule can be applied to your task template to overrule pre-set due dates if tasks are completed ahead of time. Here’s how: Edit your task template by clicking on the pencil that appears when you hover over one of your task templates. Next, click the arrow that appears next one of the tasks in your template. Scroll to the bottom and you’ll find an area called ‘Rules’. Click the button to add a rule to the task.
Here is the setting to use when implementing this use case:
Scroll to the bottom and you’ll find an area called ‘Rules’. Click the button to add a rule to the task.
Here is the setting to use when implementing this use case:
Add the following task rule to the second task in the workflow
 This means if the previous task is completed early, the next task will automatically be assigned the next day to shorten the time it takes your team to complete projects.
Use a Task Rule to Streamline Project Handoffs Between Teams
This task rule saves you time by eliminating the need to manually email and track projects as they change hands. If your workflows are complex and involve multiple teams, you can use a task rule to automatically update the project owner as the project moves between departments for approval. This automates the “passing of the baton” so you don’t have to manually email people to notify them when a project moves forward in the workflow. Here is the setting to use when implementing this use case:Add the following task rule to the last task before the project moves to a different department

Use a Task Rule to Automatically Reschedule Overdue Tasks
Many things come up that can impact project timelines. A coworker is out sick. You are waiting for feedback from a client. Or stakeholders are taking longer than you anticipated to approve tasks. Regardless of the reason, it shouldn’t take hours of your time to reschedule overdue tasks. Add a task rule that automatically reschedules the project to reflect overdue tasks; giving you a more accurate picture of project timelines. Here is the setting to use when implementing this use case:Add the following task rule to the last task before the project moves to a different department

The post Task Management in CoSchedule: Finally Get Visibility Into Team Priorities appeared first on CoSchedule Blog.